Texture drawing

1
Ok, so I've gone even further down madman lane here, but now I'm a bit stuck. I have a HUGE surface area to texture, and only one fairly limited method of drawing textures, which looks horrible when overused.

Obviously, I need more ways of doing it - and especially suggestions as to how to improve my bog standard boring one that I've overused so far.

So, that's what this thread's for - how do the modders/artists round here do metal - especially hull plates? The more different methods/tutorials/tips we get the better. :)

Here's mine... (copied&pasted from HLP)

For PSP 9, you do the following:
1 ) Set colour 1 to a dark grey & colour 2 to pitch black
2 ) Flood fill the entire area you want to turn into plating (if you have pre-existing plate outlines in place, make sure they're on a separate higher layer or something)
3 ) Set colour 2 to use this (from BW) or a similar sort of texture with an angle of 38, and a scale of about 48
4 ) Apply it to your solid filled base colour (the whole thing) twice or so to get the desired brightnes of that bit of hull.
5 ) If you havn't already, create your hull plate outlines (I've found black, 1 pixel wide, no AA lines work best) and make sure they're a raster layer.
6 ) Merge all the layers so the outlines are on the same layer as the background hull.
7 ) Magic-wand-select (tolerance = 40, no AA) each individual plate outline you want to raise (if you've never heard of the wand, it's basically a 'select all connected pixels of colour X, with a tolerance factor)
8 ) When all the plates you want to raise are selected, use the bevel tool to raise them all. I found the following properties to work best for the plating effect: Straight slope, Width = 3, Depth = 2, Shininess = 28, Angle = 39, Intensity = 43, Elevation = 46, Light = White, All other settings = 0

Result:
Image
And that should do it. Now, I'm sure all the texture Guru's here are looking at this shaking their heads in pity, but it provides a decent base technique, and needless to say, you can fiddle with any part of it to best suit your ship. ;)
Twisted Infinities

4
from my limited experience:

I think what you've done so far looks great. You could do with some markings and panels (warning signs, maintenance access). Some random colour would help. Glowing conduits mad a big difference to the reactor I posted on HLP. Just something to break it up. I'd be careful if you're gonna tile it though.

5
I think what you're tring to do looks awesome. I'd be more than happy to offer my experties, however I don't have any! Good luck with what you're trying to do.

6
Interesting technique, certainly has brilliant outcomes thats for sure. :D

Aldo does a pretty good job too, if you can drag his arse in here. lol.

I share a similar technique to him and a few others (partly because I nagged them for assistance), mind I'm still yet to complete a full blown texture, still learning it as I go along.

Basically I take the 100+ layers approach. Start with a base colour and make a shape, next layer, make some strong indentation outlines for the 'raised' sections, next layer do the highlights for outlines, next layer do the shadows for outlines, next 3 layers same thing but for the smaller outlines and itty bits aka gibblets.

After the base colour and outlines are done start a new layer and start adding in a bit of shading, grime, etc. Basically a manual approach to what you used that scortched texture for. (probably more efficient your way...), do the shadows and highlights for these.

From there it's basically a build up of layer after layer until you have something that looks realistic and pretty. :) Adding grime layers, spongey layers, rusty layers, damage layers, burned layers, paint layers, colouration layers, etc etc. Until one builds enough character into the texture.

From there, the world is your oyster, make some shine maps for it using the different layers as a base. Maybe some glow maps, or other assorted things you may want to play with. :)

But yeah, alot of this is basically assimilated knowledge from others in the Freespace community, albeit mainly aldo, DaBrain, and Omniscaper, whom I've hounded before for advice. :p

Realistically, I'm yet to find the time and effort to pull a fully successfull attempt off myself. I've now assimilated your knowledge as well though, so when the time comes, hopefully I have some margin of success. :p

Hope that's in some way helpfull. ;)
Grug
Returned Loveable SectorGame Addict

The Apocalypse Project | Machina Terra | Lost Souls | Starfox: Shadows of Lylat | Stargate SG1: Earth's Defense

7
Offhand, my texturing is done over several layers; I don't do tiles nowadays, but the basic template tactics work with minor changes...offhand;

1/ base layer; colour segmentation

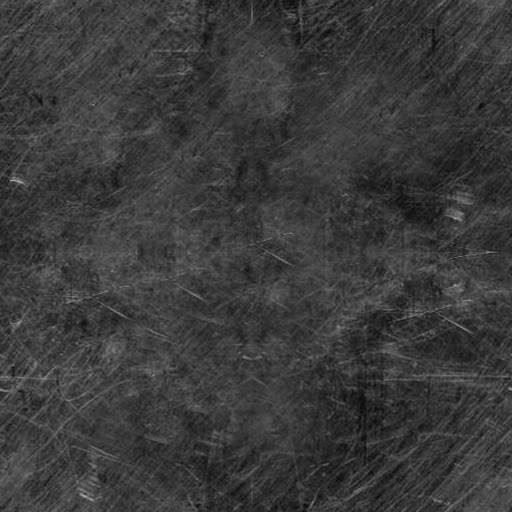
2/ shading/noise layer. Basic light/dark shading combined with 5 noise and 2 pixels motion blur.

3/ colouration layer; overlaid colours (colour blend); this is more relevant for templating

3.5/underlay; I've just started experimenting with this; basically some form of abstract shape 'under' but on top of the colouration layers. for tiled textures, try overlaying lots of thick rectangles of 20 thickness, at about 10% black or 5% white - this is sort of a B5 effect which adds a nice breakup to the surface

4/ white shading layer; about 10-20% opacity of shading using a round brush

5/ black grain; 20-30% opacity using a black grained (i.e. pixellated) brush. This generally is used to cover up the white areas once 6 is done

6/ black shading; 30-40% shading, the 'inverse' of white.

7/vthin white; 4% or so very fine detail in white lines. Just a surface breakup effect - usually take layer 8, invert it and shift 1 pixel to the side and down.

8/vthin black; very low opacity (5% ish) black lines filling in the gaps of the other more visible panelling lines. This is a pain in the arse to do, and the actual value is debatable.

9/thin white; manually drawn white-offset lines to L10; about (IIRC) 10%

10/thin black; thin panels in between the thick lines, about 20-30%. This is the lowest level of visible panelling

11/rust; brown 'star' paintbrush effects under the thickest lines, usually a burn layer at about 5-15%

12/charcoal; this is rather an odd one; basically take a medium thick black round brush, 'trace' round under the thickest lines, apply a charcoal effect and set to about 10-15% opacity

13/thick-1pt white; about 20-30% opacity white, tracing layer 14

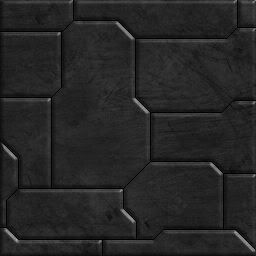
14/thick-1pt black; 55-70% opacity black, tracing thinner but still very visible lines between the plates defined by 16; this usually follows the template lines so it's marking polygon edges.

15/thich-2pt-white; actually a 1pt white line at 20-30% opacity which traces 16

16/thick-2pt-black; black 2-point lines forming the edges of the primary hull plates. Highly visible, and must be used sparingly for effect. About 60-80% opacity.

16.5/
Additionally, I sometimes add a layer under the rivets. this is basically a brown star under each rivet position, blurred and low opacity. i'm not sure if it's necessary, though.

17/rivets; manually drawn rivets across the sides of the 16 lines (this is why we use 16 sparingly, and even then you only want a limited number of rivets). Basically, take a suitably sized round white brush, and draw a circle with it (dot). Then take the same size brush, make it black, and dot on top of the existing white circle very slightly offset. And you have a nice rivet. Set to about 90% to avoid it being too stark.

18/solids; stuff which isn't drawn layered but all in one do to be visually distinct. I.e. gun barrels, engines, etc. Drawing these is really a combination of the previous layers work on a single layer; for example a gun barrel is usually shading + noise + low opacity overlapping rectangles + some lines + white overlay + brown overlay + burn (latter 3 use a grainy brush).

19/ highlights; this is a new one for me; it's only seen on the Claymore so far. Basically, take a white star brush and apply it across the lighted parts of the ships. Set the layer to overlay (er, I think; might be multiply) and between 30-60% opacity to taste.

20/highlights 2; brighter version of 19; used sparingly for key parts.

21/paint; labels, decals, etc. Draw to taste, select, apply some noise (or manually add white + black grain), then set to about 50% opacity. finally, take an eraser (grain) and go about selectively removing the labels as if they'd been scored away etc. You may want to move this down to under the thick plate layers.

22/text; as for paint; if we have the maps set out for this, apply some text using the same method as 21. Yay!

23/Damage; damage effects like burns, scrapes, bullet-marks. for bullets in particular; take a white 'star' brush, place it on the map. Then place a black star on top slightly offset. Looks lovely. Might want to blur and set to about 80% opacity so it looks best.

24/glow soft; multiply blurred glow imitating lighting effects.

25/glow hard; solid glows. i.e. bright red solid blocks for lights, etc. Sometimes soft glows next to missile bays, etc. Also engine glow effects.

26/ drawing aid; keep a copy of the map template in wireframe, sans the white bits (duh; i.e. so it's only the lines), low opacity and use it as an aid for the lines, etc.

Phew. Rough principle I follow is really simple; at the end, you want to make sure no pixels have the same colour as their neighbours. Obviously that's not a strict rule, but it's a good guide to get a nice mix of detail. also, as with the vthin lines etc, you need to add incredibly subtle stuff to get the best effect overally.

I'll try and see if I can find a recent map which is small enough to upload as an aid, but I doubt I'll have one; they normally are rather huge in PSD format IIRC.

EDIT; claymore render; http://www.sectorgame.com/aldo/media/gtf_claymore.jpg - you can see some of the line mix, the highlights and the little decal scrapes etc here. hopefully.

Bear in mind, though, this was a render with spec-maps, etc, so the actual model-map is somewhat less, um, 'vivid'. Particularly RE: bump maps.

8
Wow - I've been experimenting with the layered technique, and I love it!
The grime, colour and rust layers, though far fewer and inferior to Aldo's, combine to form a far better surface than I've ever managed before. :D

Thanks muchly to all!

Incidentally, I located some other texturing tutorials via google, so I'll stick them up in the hopes someone finds them useful. :)

http://www.bluephantom.de/textures1.html

http://eawnexus.gamingsource.net/forums ... wtopic=171

http://www.darksaber.gaylenol.com/tuttexture02.htm


And finally - I think my overused technique is misleading peeps to think I'm using texture tiling. Just to set the record straight, I'm not....
Twisted Infinities

10
Damn, haven't been around here for ages....

Texturing large areas is always a pain, especially with tiles. One trivk is to use a very big tile, or possibly put some low poly blocks over the flat area with a contrasty texture to help break up the repetitiveness.

One trick I've found is to snap individual polies into another material, UV map them over the same tile and add lights to them, I've even managed to animate those lights on occasion, the simply presence of non-repeating glows can often break up the repetitiveness.
Check out my music on my YouTube channel :

https://www.youtube.com/user/PRDibble/videos

11
This broadcast is brought to you by:
Tom Molyneuxs brains ministry of information!
Dooo, de doo doo de do do de doooo!

Hello! this is my guide on What Not To Texture Your Ships Like.

Surely you have played Freespace the great war. If you have then you will remember the awe you felt as you gazed along it's massive hull. The beautiful Orion, should not have it's textues copied.

The end.

Thanks for posting those links Vasudan Admiral, texturing tutorials are teh useful!

By teh way, what would you say (as a concensus of opinion) is the best program for good texturing?
'Memory and imagination are but one thing, which for diverse considerations, have diverse names'
¦- F R E D E N T H U S I A S T -¦

12
I use Photoshop, the ability to use layers is invaluable when moving stuff around, adding effects etc :)
Check out my music on my YouTube channel :

https://www.youtube.com/user/PRDibble/videos
Post Reply

Return to “FreeSpace”